Catching a mite problem early is hands down the best way to keep your feathered mate healthy and happy. A good quality mite spray for birds is a must-have in your kit, but knowing what you’re up against is the first real step toward getting rid of them for good.
Understanding Bird Mite Infestations
Mites aren't just a simple annoyance. They are persistent parasites that can cause real distress and serious health issues for our birds here in Australia. We're talking relentless itching, feather damage, anaemia, and even nasty secondary infections. An infestation is not something to take lightly.
These tiny pests thrive in our warm, humid climate, which turns aviaries and cages into perfect breeding grounds. They're masters of disguise, hiding in tiny cracks in perches, nesting boxes, and cage bars, often staying invisible until their numbers explode.
Common Culprits in Australian Aviaries
For Aussie bird owners, two troublemakers pop up more than any others: Red Mites and Scaly Face Mites. Each brings its own set of problems and needs a sharp eye to spot the first signs.
- Red Mites (Dermanyssus gallinae): These are nasty nocturnal critters. They hide away during the day and creep out at night to feed on your bird’s blood. An infestation can lead to a restless, agitated bird, anaemia, and in bad cases, can even be fatal, especially for chicks or weaker birds.
- Scaly Face/Leg Mites (Knemidokoptes pilae): You’ll see these most often in budgies. The mites burrow into the bare skin around the cere, beak, and legs. They cause a telltale honeycomb-like or crusty growth and can lead to permanent deformities if you don’t get on top of it quickly.
To help you tell them apart, here's a quick reference guide.
Common Australian Bird Mites and Their Telltale Signs
This table should give you a starting point for figuring out what you might be dealing with.
| Mite Type | Commonly Affected Birds | Key Symptoms to Look For |
|---|---|---|
| Red Mite | Canaries, finches, pigeons, poultry, parrots | Restlessness at night, reluctance to enter the nest box, pale combs/wattles (anaemia), visible tiny red or grey specks after feeding. |
| Scaly Face/Leg Mite | Budgies, canaries, finches | White, crusty, honeycomb-like growths on the cere, beak, eyelids, legs, and feet. Beak deformities in advanced cases. |
| Northern Fowl Mite | Poultry, canaries, wild birds | Grey or blackened, dirty-looking feathers (from mite droppings), scabby skin, feather loss, general weakness. Mites live on the bird 24/7. |
| Air Sac Mite | Canaries, finches (especially Gouldians) | Clicking sounds, coughing, sneezing, open-mouthed breathing, tail-bobbing, voice changes or loss of song. Often no visible external signs. |
Expert Advice: A proper diagnosis from an avian vet is always the best course of action if you're unsure.
The Broader Impact of Bird Mites
The trouble with bird mites doesn't just stop with our pets. These infestations can pose a real risk to both wild and domestic birds right across Australia. Public health authorities like SA Health have pointed out that Ornithonyssus bursa, another common species, can even bite humans after birds leave their nests, with numbers spiking in spring and summer.
This highlights how crucial it is to manage mite populations properly as a non-negotiable part of good bird care.
Spotting the problem is the first and most critical step. Early detection often means the difference between a simple treatment and a prolonged, stressful ordeal for both you and your bird.
Because of this, being proactive is the only way to go. It all starts with knowing how to spot an issue, then moving quickly to choose a treatment that's both safe and effective. The right mite spray for birds protects your companion, but the wrong one can cause serious harm.
How to Choose a Safe Mite Spray for Your Bird
When your bird is clearly uncomfortable, it’s tempting to grab the first mite spray you see. But hold on. Choosing the right product isn't just about getting rid of pests; it's about keeping your bird safe. The wrong spray could be a waste of money, or worse, dangerously toxic.
Making a smart choice starts with flipping the bottle over and reading the label. You don’t need a chemistry degree, but knowing what’s inside that spray is the most important thing you can do.
Decoding the Active Ingredients
When you scan the ingredients list, a few names will pop up again and again. The trick is knowing which ones are trusted in avian care and which are a massive red flag.
- Look for Pyrethrin-Based Formulas: Most bird-safe mite sprays use pyrethrins as the main active ingredient. These are natural extracts from the chrysanthemum flower and are a reliable choice for treating external parasites on birds when used correctly.
- Piperonyl Butoxide as a Helper: You’ll often see Piperonyl Butoxide listed alongside pyrethrins. This isn’t an insecticide itself. Instead, it works to make the pyrethrins more effective, which means a lower, safer concentration can be used.
- Methoprene for Long-Term Control: Some of the better formulas include an Insect Growth Regulator (IGR) like Methoprene. This clever addition doesn’t kill adult mites, but it stops their eggs and larvae from developing, breaking the life cycle and preventing a comeback.
This trio is the standard for an effective and safe over-the-counter mite treatment for birds in Australia. You'll find a good selection of treatments built on these ingredients among quality parrot supplies in Australia.
Ingredients to Avoid at All Costs
Knowing what to look for is only half the battle. Knowing what to avoid is just as crucial. Some chemicals are incredibly dangerous for birds and should never be used on or even near them.
The cardinal rule of bird care is simple: never use a product on your bird that isn't specifically made for birds. Sprays for dogs, cats, or general household pests can be lethal.
The most dangerous offenders are organophosphates (OPs). Here in Australia, pesticide toxicity from organophosphates like fenthion ethyl and diazinon has had devastating results, causing the deaths of hundreds of native birds in single poisoning events.
As Wildlife Health Australia reports, these chemicals are often behind mass toxicities in wild bird populations. Even birds that survive exposure can suffer from serious, long-term health problems. This really drives home how vital it is to pick the right spray. To learn more about these pesticide toxicity findings, you can check out their detailed fact sheet.
Reading the Label and Talking to Your Vet
Always, always read and follow the manufacturer's instructions to the letter. The label gives you critical information on the correct dosage, how to apply it, and how often to treat your bird. Pay close attention to any warnings, especially about good ventilation and protecting your bird's eyes and breathing during application.
Dosage is a big deal. What’s safe for a large galah could easily be an overdose for a tiny finch. If the label is vague or confusing, that’s a red flag.
Ultimately, the best first step you can take before starting any treatment is a quick chat with your avian vet. They can properly diagnose a mite problem, rule out other health issues that might look similar, and recommend a product that’s right for your bird’s species, age, and health. Their expertise ensures you're on the safest path to getting your bird comfortable again.
Safely Applying Mite Spray to Your Bird
Treating your bird for mites yourself can be a bit nerve-wracking, but with a calm approach and some prep, you can make it a stress-free experience for your feathered friend. The key is to be gentle and efficient. Rushing things will only cause panic.
First things first, set the scene. Choose a quiet, secure room where your bird can't easily fly off if it flutters from your hands. Most importantly, the space must be well-ventilated so neither of you inhales too much of the spray. Cracking a window is a great idea.
Preparing for a Calm Treatment
Before you catch your bird, get everything ready and within arm's reach. This small step saves a lot of fumbling around and shortens handling time.
- Have the mite spray bottle shaken and ready to go.
- Get a soft, clean towel. A simple face washer is perfect for smaller birds.
- Keep some of your bird’s favourite treats handy for positive reinforcement afterwards.
Gently wrapping your bird in a towel can give them a sense of security and gives you much better control, stopping them from flapping wildly. Use the "towel grip" that avian vets recommend—wrap them securely but not tightly, leaving their head free while keeping their wings safely tucked against their body.
The infographic below walks you through the crucial decisions you should have already made.
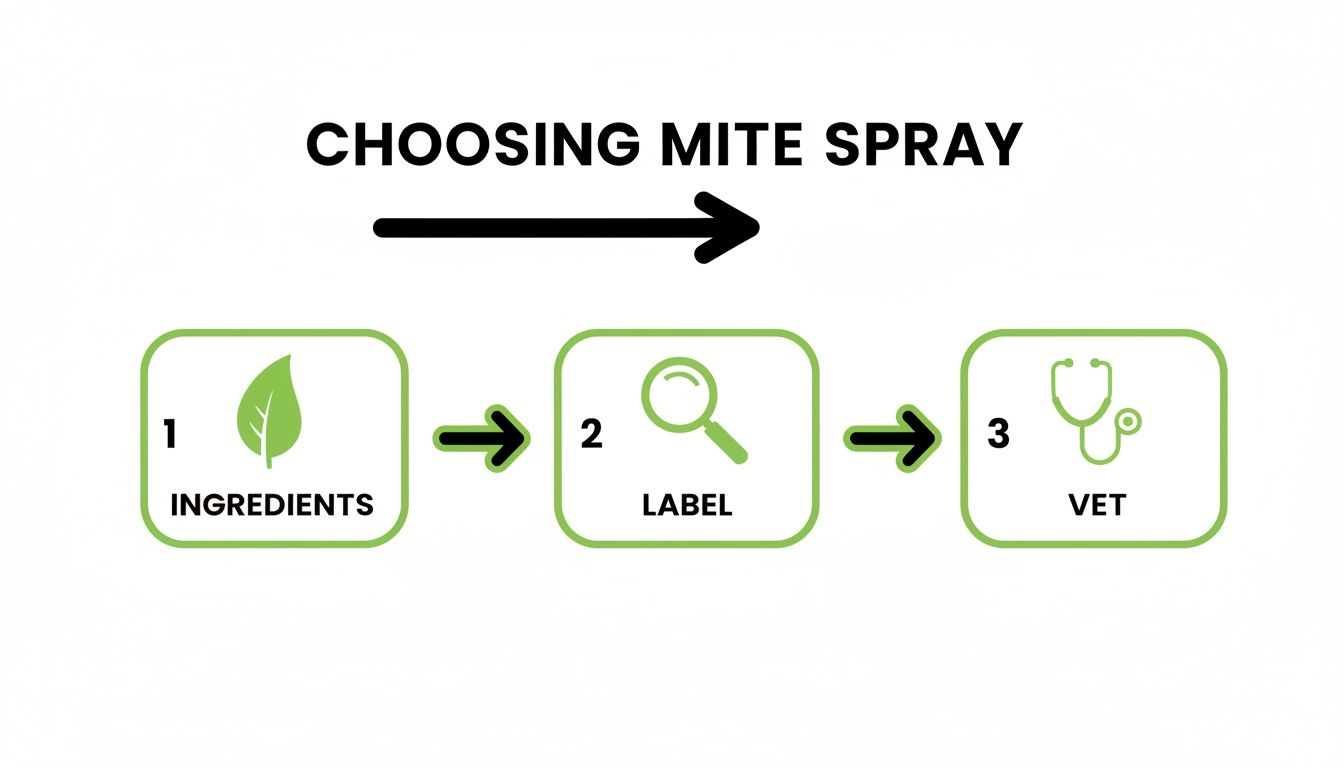
This chart simplifies the selection process. It drives home the point that checking ingredients, reading the label, and talking to your vet are the non-negotiable foundations of any safe mite treatment.
The Correct Application Technique
With your bird securely held, it’s time to apply the spray. Confidence is key. If you're calm, your bird has a much better chance of staying calm too.
Your number one priority is to protect your bird's head, face, and especially their eyes. Never spray directly at their face. A simple and effective way to do this is to use your free hand or a small cloth to gently cover their head while you spray their body.
Hold the bottle at the distance recommended on the label, which is usually about 20-30 centimetres away. This ensures you get a fine, even mist rather than a soaking jet that will frighten them. Apply a light mist, gently lifting the wings to spray underneath. Don’t forget the area around the vent, as mites love to gather there. You’re aiming for slightly damp, not dripping wet.
Remember, more is not better when it comes to mite spray. Over-applying can lead to skin irritation or even toxicity. Always stick to the product's dosage instructions.
Post-Treatment Observation
Once you're done, release your bird back into its cage. They’ll probably start preening straight away, which is normal. Now is the time to watch them closely for any signs of an adverse reaction.
Keep an eye out for:
- Shivering or looking chilled
- Wheezing or difficulty breathing
- Loss of balance or coordination
- Unusual tiredness or listlessness
If you spot any of these signs, get on the phone with your avian vet immediately. Offering a favourite treat, like a piece of millet or a fun new foraging toy, can help make the whole thing a more positive experience and distract them.
Size really does matter here. A delicate zebra finch needs a much lighter touch than a robust galah. For tiny birds, some owners prefer to spray a soft cloth and gently wipe it over their feathers, avoiding the head. This gives you more control and reduces the risk of chilling them. Your bird relies on you, so a gentle, confident approach will make all the difference. Simple enrichment like new toys or interesting perches can also help ease any post-treatment stress.
Cleaning The Cage to Eradicate Mites Completely
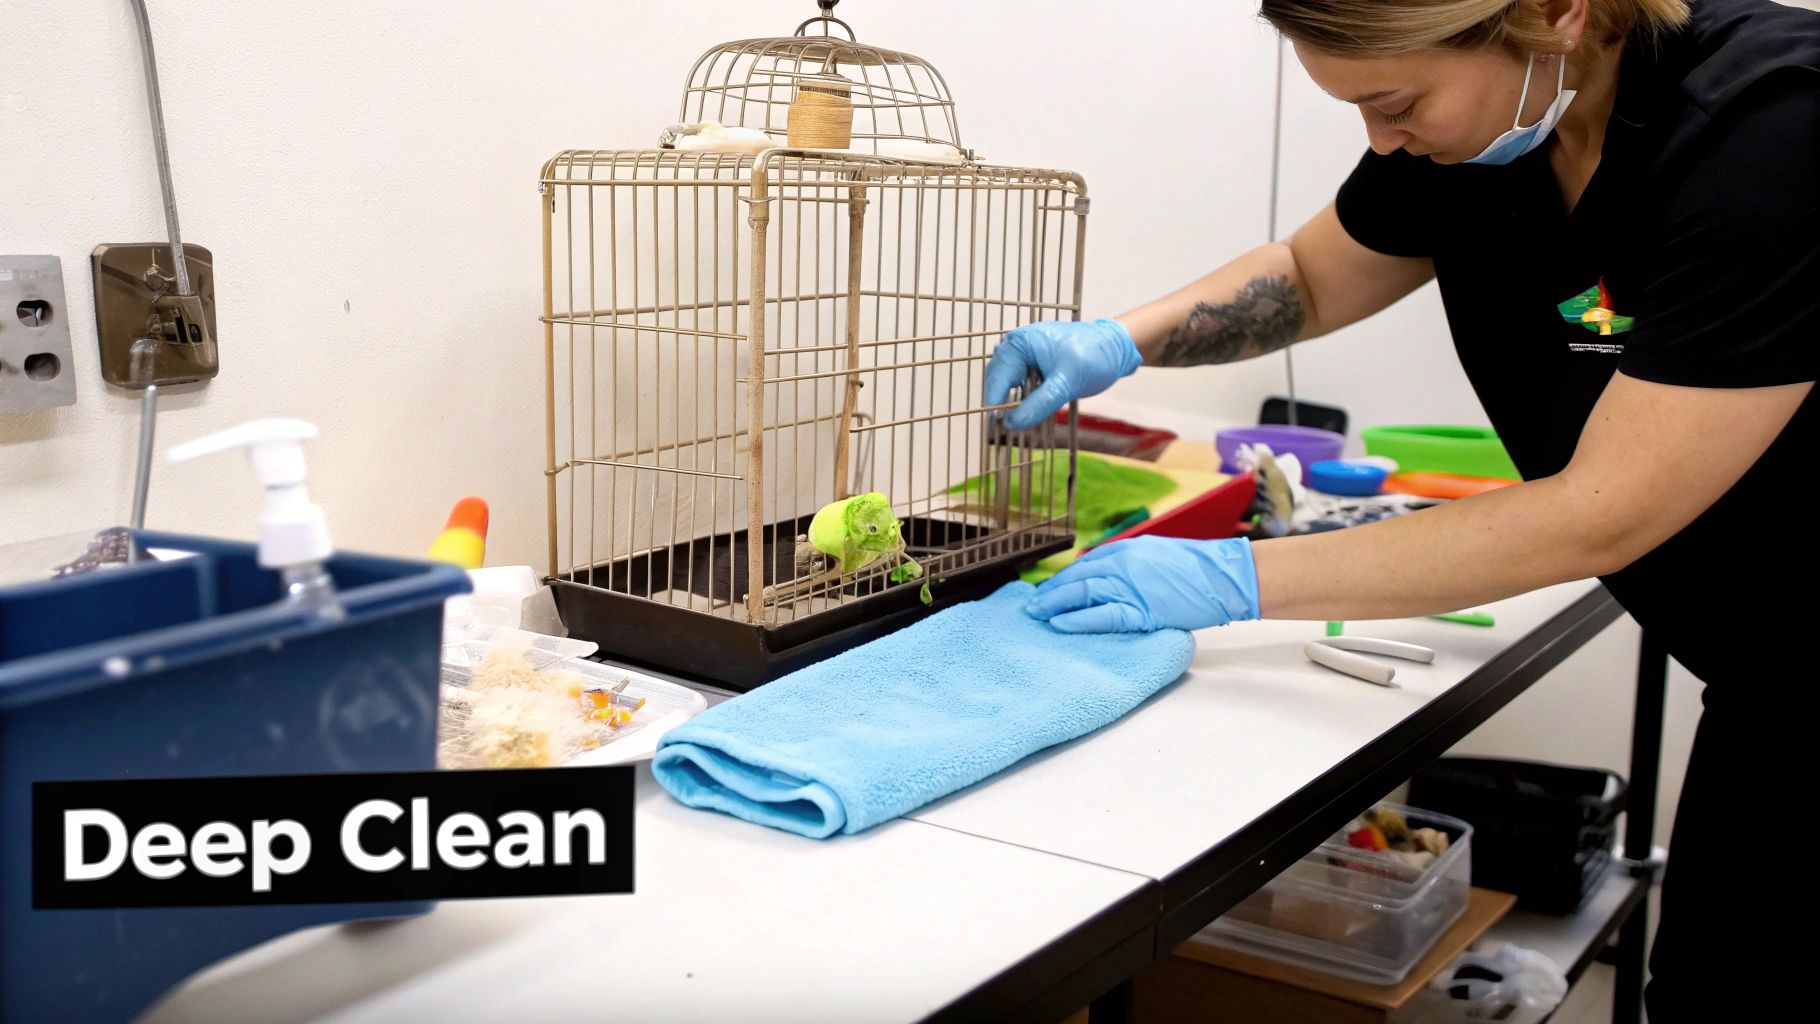
Successfully treating your bird for mites is a great first step, but it’s only half the job. If you pop your freshly treated bird straight back into an infested cage, you're guaranteeing a re-infestation. You'll be caught in a frustrating loop.
Mites are masters of stealth. Their eggs can sit dormant in the tiniest cracks and crevices of your bird’s environment, waiting to hatch. To get rid of them for good, your decontamination plan needs to be just as thorough as the treatment you gave your bird. This means a full, top-to-bottom deep clean.
The Deep Clean Action Plan
First thing's first: get your bird out of there. Move them to a separate, secure temporary cage, preferably in another room. This keeps them safe from cleaning fumes and stops re-exposure to mites you might stir up.
Your mission is to leave no perch unturned. Mites are microscopic survivors, so you can't afford to cut corners.
- Completely Empty the Cage: Take out everything. Perches, feeders, water bowls, and every last one of the bird toys.
- Scrub Every Surface: Using a bird-safe cleaner, get to work on the cage bars, base, and tray. Focus on the corners, joints, and welds where mites love to lay their eggs.
- Soak and Disinfect: Any non-porous items like plastic feeders and stainless-steel toys should be soaked in a bird-safe disinfectant, then scrubbed clean and rinsed thoroughly.
- Dry Completely: Ensure everything is bone-dry before reassembly. Mites love damp conditions.
A critical mistake is underestimating where mites can hide. They can infest the hollow ends of perches, the weave of a rope toy, and even the tiny screws holding the cage together. Being exhaustive is the only way to win.
Choosing Safe and Effective Cleaning Agents
The products you use to clean the cage are just as important as the mite spray. Many common household cleaners contain chemicals that are extremely toxic to a bird’s delicate respiratory system.
Never use:
- Bleach
- Ammonia-based cleaners
- Strongly scented disinfectants
- Phenolic compounds (often found in all-purpose cleaners)
Stick to avian-specific, bird-safe disinfectants from pet supply shops. A simple solution of white vinegar and water can also work well for scrubbing, as long as you rinse everything thoroughly afterwards. For a really deep clean without chemicals, a high-pressure steam cleaner is a fantastic tool for killing mites and their eggs in hard-to-reach spots.
Recent research into pet care in Victoria highlighted some worrying habits. The study showed that a huge 44% of birds weren't checked or treated for external parasites. What’s more, 8% of owners admitted to using dangerous human sprays or bleach for cleaning, which introduces serious toxins into a bird's environment. You can discover more insights from this Victorian pet care research by reviewing the full findings.
When to Replace and When to Return
After a mite infestation, you can't salvage everything. Porous materials like wood, rope, and natural fibres are nearly impossible to decontaminate completely.
- Wooden Perches and Toys: It's best to discard old, porous wooden items. Mite eggs can be embedded deep within the grain, ready to hatch and start the cycle all over again. Replacing them with fresh perches and swings is a small price to pay for peace of mind.
- Natural Fibre or Shredding Toys: These should also be thrown out. Think of it as a chance to give your bird some positive enrichment after the ordeal by replacing them with new, engaging foraging toys for birds.
- Nesting Boxes: These are prime real estate for mites. It's almost always better to get rid of old nesting material and boxes and start fresh.
Once the deep clean is done, let the cage and all its contents air out for several hours before reintroducing your bird. This ensures any leftover fumes from even the safest cleaners have dissipated. Schedule a follow-up clean in about 7-10 days to catch any newly hatched mites and break their life cycle for good.
Long-Term Mite Prevention Strategies
You’ve done the hard work of treating an infestation and deep cleaning the cage. Now, the goal is to make sure those tiny pests never get a chance to come back.
This is about shifting from a reactive "fix-it" mindset to a proactive, preventative one. It’s not about constantly spraying chemicals; it's about creating an environment where mites simply can’t thrive. A little consistency with a few smart habits will keep your aviary a healthy, mite-free zone.
Creating a Mite-Resistant Environment
Think of your bird's cage as their castle. Your job is to make it an impenetrable fortress against mites. The best way to do that? Relentless cleanliness. Mites love dusty, dirty corners where old food and droppings accumulate. A solid cleaning routine is your number one weapon.
- Daily Tidiness: Every single day, swap out the cage liner. Give the food and water dishes a quick wash and get rid of any uneaten fresh food.
- Weekly Scrub-Down: At least once a week, it’s time for a more thorough clean. This means scrubbing down the perches, cage bars, and base with a bird-safe cleaner. This stops the build-up of the organic gunk that mites feast on.
- Smart Cage Placement: Where you put the cage matters. Try to avoid placing it right next to open windows where wild birds might hang out, as they’re a common source of mites. Keeping the cage out of damp, stuffy parts of your home also makes it a much less inviting place for pests.
The Importance of Quarantine
One of the sneakiest ways mites enter a home is by hitching a ride on a new bird. It doesn’t matter how healthy the newcomer looks or where you got them from—a strict quarantine period is non-negotiable if you have other birds.
Expert Advice: A minimum quarantine of 30 to 45 days is the gold standard in Australian avian care. This window gives you enough time to watch the new bird closely for any signs of illness or parasites before they get a chance to infect your existing flock.
During this time, the new bird needs to be in a completely separate room with their own dedicated food, water, and cleaning gear. This simple biosecurity measure is the single most effective thing you can do to prevent mites and other diseases from spreading through your aviary.
Routine Health Checks and Knowing When to Call the Vet
Being a proactive bird owner means being an observant one. Get into the habit of doing regular health checks with your bird. Gently look at their skin, feathers, feet, and the area around their beak and cere. You’re looking for anything that seems off—restlessness, excessive preening, or the first signs of scaly build-up.
While having a good mite spray on hand is essential, it’s just as important to know when a problem is bigger than a home remedy. If you spot any of the following, get in touch with your avian vet straight away:
- Severe Infestation: If you can see mites crawling on your bird, or if their skin is visibly red, raw, and irritated.
- Signs of Secondary Infection: Look for weeping sores, pus, or inflamed skin. This is a sign that bacteria have gotten into the mite bites.
- Worsening Symptoms: If you’ve started treatment but your bird’s condition isn’t getting better—or is getting worse.
- Systemic Illness: Red flags like lethargy, loss of appetite, or any trouble breathing mean the problem is serious. A strong immune system starts with good food; learn more by exploring options for what parrots can eat.
Your vet has the tools and expertise to figure out exactly what’s going on and can prescribe stronger, more targeted treatments if necessary. When it comes to your bird's long-term health, their guidance is invaluable.
Common Questions About Bird Mite Sprays
When it comes to treating your feathered friend for mites, it's completely normal to have a few questions. Getting clear, straightforward answers is the key to acting with confidence and keeping your bird safe. We've pulled together some of the most common queries from Australian bird owners to help.
How Often Should I Use Mite Spray On My Bird?
The right frequency really hinges on the specific product you’re using and how bad the infestation is. Your first port of call should always be the manufacturer's label – those instructions are there for a reason and provide the safest guide.
A typical treatment plan often starts with an initial spray, then a follow-up about 7-14 days later. This timing is deliberate; it’s designed to catch any newly hatched mites that survived the first round, effectively breaking their life cycle.
Some products might suggest a preventative spray once a month, but it’s best to be cautious to avoid over-exposing your bird to chemicals. For a schedule that’s perfectly suited to your bird's situation, a chat with your avian vet is always the best bet.
Are Natural Alternatives to Chemical Mite Sprays Effective?
Many owners understandably look into natural options like diatomaceous earth or essential oil mixes, but their effectiveness for an active infestation can be hit-and-miss. Food-grade diatomaceous earth, for example, is an incredibly fine powder that can cause serious respiratory irritation if your bird breathes it in.
Essential oils are another tricky area. Most are highly toxic to birds unless extremely diluted and used under expert guidance.
When you're dealing with a confirmed mite problem, a vet-approved, bird-safe mite spray for birds is your most reliable solution. Natural methods are generally better suited for preventing issues in the cage or aviary, rather than for direct treatment. For more general advice, you can always explore our detailed FAQ page.
Expert Advice: Never assume a "natural" product is automatically safe for your bird. Their respiratory systems are incredibly sensitive, and what's harmless to us can be dangerous for them. Always check with an avian professional first.
Can I Use a Dog or Cat Mite Spray On My Bird?
No, absolutely not. This is one of the most critical safety rules in looking after birds. You should never use a flea or mite treatment that was formulated for a dog or cat on your bird.
These products contain chemicals and concentrations, like high-dose permethrin, that are incredibly toxic to birds. A bird's metabolism and respiratory system are far more fragile than a mammal's. Using the wrong product can lead to swift and tragic consequences. Stick exclusively to products clearly labelled as safe for avian use.
At Lou Lou Bells Bird Toys, we believe a healthy bird is a happy bird. For all your enrichment needs to keep your companion stimulated and stress-free, visit our collection at https://louloubellsbirdtoys.com.au.
Keep Reading
- Bird Care: Essential Guide To Caring For Pet Birds
- Parrot Supplies Australia
- What Parrots Can Eat: A Guide To Feeding Your Pet Parrot
Disclaimer Summary:
The information in this article is general in nature and may include external links or resources not created by Lou Lou Bells Bird Toys. Every bird is unique, so we encourage you to seek personalised advice from your own veterinarian or avian specialist. For full details, please read our complete disclaimer here.